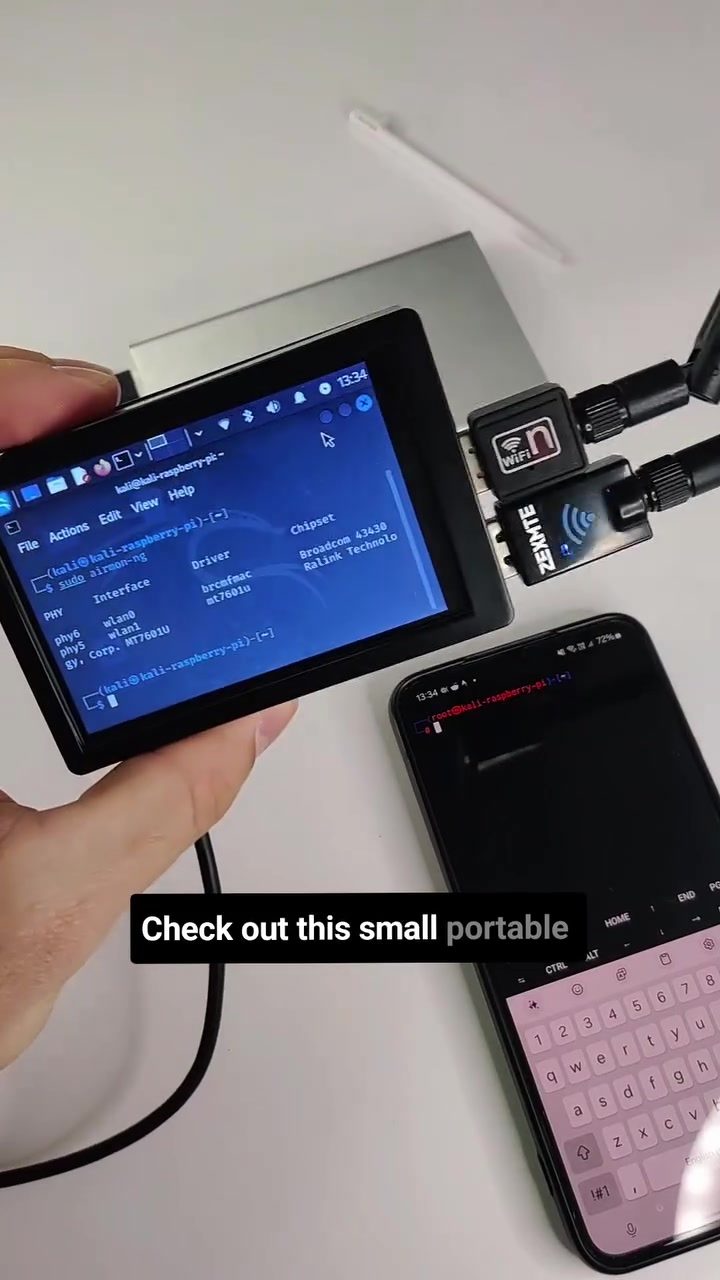
Building a Portable Kali Box with a Raspberry Pi
Creating a portable Kali Linux setup with a Raspberry Pi offers a convenient and powerful tool for penetration testing on the go. This compact configuration allows you to carry out security assessments and ethical hacking tasks anywhere, using a small, versatile device.
Why This Matters
In the world of cybersecurity, having a portable and reliable setup is crucial. Whether you're a professional penetration tester or a hobbyist, the ability to conduct security assessments from any location can be a game-changer. A portable Kali box running on a Raspberry Pi provides the flexibility to work in various environments, from remote locations to on-site assessments, without compromising on performance or functionality.
Setting Up Your Portable Kali Box
Setting up a portable Kali box with a Raspberry Pi involves several key components and steps. Here’s a breakdown of the essential elements and the process to get your setup running smoothly.
Components Needed
-
Raspberry Pi: The Raspberry Pi is a compact, affordable, and powerful single-board computer that serves as the core of your portable setup. The Raspberry Pi 4, with its enhanced processing power and connectivity options, is particularly well-suited for this task.
-
Screen: A small, portable screen is essential for on-the-go use. This allows you to interact with your Kali box directly, without the need for an external monitor.
-
External Battery: Powering your Raspberry Pi with an external battery ensures that you can operate your setup for extended periods without access to a power outlet.
-
External Adapters: Bluetooth and Wi-Fi adapters expand the connectivity options of your Raspberry Pi, allowing you to connect to various networks and devices.
-
Input Devices: A touchscreen pen or capacitive stylus can make interacting with the tiny screen more convenient. Additionally, a compact keyboard can be connected for text input.
-
Connectivity Options: You can control your Raspberry Pi using a smartphone or tablet via SSH or VNC, adding an extra layer of convenience and flexibility.
Step-by-Step Setup
-
Install Kali Linux: Download the official Kali Linux image for the Raspberry Pi from the Kali Linux website. Use a tool like
balenaEtcherto flash the image onto an SD card or microSD card. -
Connect Peripherals: Attach the screen, external battery, and any necessary adapters to your Raspberry Pi. Ensure that all connections are secure and that the system recognizes each component.
-
Power On and Boot: Insert the SD card into your Raspberry Pi and power it on. The system should boot up and display the Kali Linux desktop on the connected screen.
-
Configure Networking: If you are using external Wi-Fi or Bluetooth adapters, configure the network settings to ensure that your Raspberry Pi can connect to the internet and other devices.
-
Install Additional Software: Depending on your needs, you may want to install additional penetration testing tools or custom configurations. The Kali Linux repository offers a wide range of tools that can be installed via the package manager.
Practical Tips for Usage
Here are some practical tips to ensure that your portable Kali box functions optimally and provides the best user experience:
-
Optimize Power Management: Since you're relying on an external battery, it's crucial to manage power usage efficiently. Close any unnecessary applications and adjust power settings to extend battery life.
-
Regular Updates: Keep your Kali Linux installation up to date with the latest security patches and software updates. Regular updates ensure that your system remains secure and compatible with the latest tools and features.
-
Backup Your Configuration: Regularly back up your setup, including any custom configurations and installed tools. This will save time and effort in case of hardware failure or the need to re-create the setup.
-
Test Connectivity: Before heading out to a job site or remote location, test all connectivity options to ensure that your Raspberry Pi can connect to various networks and devices. This includes Wi-Fi, Bluetooth, and any external adapters.
Important Takeaways
-
Portability and Flexibility: A portable Kali box running on a Raspberry Pi provides the flexibility to conduct penetration testing anywhere, making it an invaluable tool for professionals and hobbyists alike.
-
Component Selection: Choosing the right components, such as a high-quality screen and reliable power source, is crucial for a smooth and efficient setup.
-
Configuration and Connectivity: Proper configuration of networking and peripherals ensures that your portable setup is fully functional and ready for any task.
-
Regular Maintenance: Keeping your system updated and maintaining a backup of your configuration will help you avoid potential issues and ensure that your setup remains reliable.
Conclusion
Building a portable Kali box with a Raspberry Pi is a practical and powerful way to enhance your penetration testing capabilities. By following the steps outlined and taking advantage of the tips provided, you can create a versatile and reliable setup that will serve you well in various scenarios. Whether you're a seasoned professional or just starting out, this configuration offers a convenient and effective solution for on-the-go security assessments.
Questions readers ask
What are the benefits of using a Raspberry Pi for penetration testing?
Using a Raspberry Pi for penetration testing offers several benefits. It provides a lightweight, portable solution that can be easily carried and used anywhere. Additionally, it allows for the creation of a small form factor penetration testing kit, making it ideal for on-the-go assessments and remote locations.
Can I connect an external monitor to my Raspberry Pi for better visibility during testing?
Yes, you can connect an external monitor to your Raspberry Pi. This can be particularly useful for tasks that require more screen real estate. The Raspberry Pi supports various display outputs, including HDMI, which can connect to standard monitors or TVs. This setup can enhance your experience during penetration testing and ethical hacking tasks.
What are the minimum hardware requirements for a Raspberry Pi to run Kali Linux effectively?
The minimum hardware requirements for a Raspberry Pi to run Kali Linux effectively include a Raspberry Pi 3 or newer, at least 16GB of microSD card storage for the operating system, and a reliable power supply. While the Raspberry Pi 3 is the minimum recommended, using a Raspberry Pi 4 will provide better performance for more demanding tasks. Additionally, having a stable internet connection and a USB Wi-Fi adapter (if necessary) can improve your testing capabilities.
How can I ensure the security of my portable Kali Linux setup on a Raspberry Pi?
To ensure the security of your portable Kali Linux setup on a Raspberry Pi, you should regularly update your Kali Linux installation and the Raspberry Pi firmware. Additionally, use strong, unique passwords for accessing the device and enable encryption for sensitive data. Regularly scan your Raspberry Pi for malware and vulnerabilities, and avoid connecting it to unsecured networks when possible.
What are some of the key features of Kali Linux that make it suitable for penetration testing?
Kali Linux is specifically designed for penetration testing and ethical hacking. It comes with a variety of pre-installed tools for tasks such as network scanning, vulnerability analysis, and exploitation. The operating system is lightweight, making it suitable for running on a Raspberry Pi, and it offers a user-friendly interface that simplifies the process of performing security assessments and ethical hacking tasks.
Can I use my Raspberry Pi Kali Linux setup for other tasks besides penetration testing?
While Kali Linux is primarily designed for penetration testing and ethical hacking, you can also use your Raspberry Pi Kali Linux setup for other tasks. The device can serve as a lightweight server, a media center, or a general-purpose computer. However, keep in mind that some tasks may require additional software or configurations, and the primary focus of Kali Linux is on security assessment tools.
How can I set up a portable lab using a Raspberry Pi and Kali Linux?
To set up a portable lab using a Raspberry Pi and Kali Linux, you will need to install Kali Linux on a microSD card and configure it to boot on your Raspberry Pi. Once booting, use tools like VirtualBox, VNC or SSH to run and manage virtual machines or remote connections. You can also use additional Raspberry Pis to simulate network environments, allowing you to practice and improve your skills in a controlled and portable setup.
Related deep dives
Similar reads based on topic and creator.




Recent articles
Fresh deep dives from the latest Reels we unpacked.




Comments
Be the first to comment.