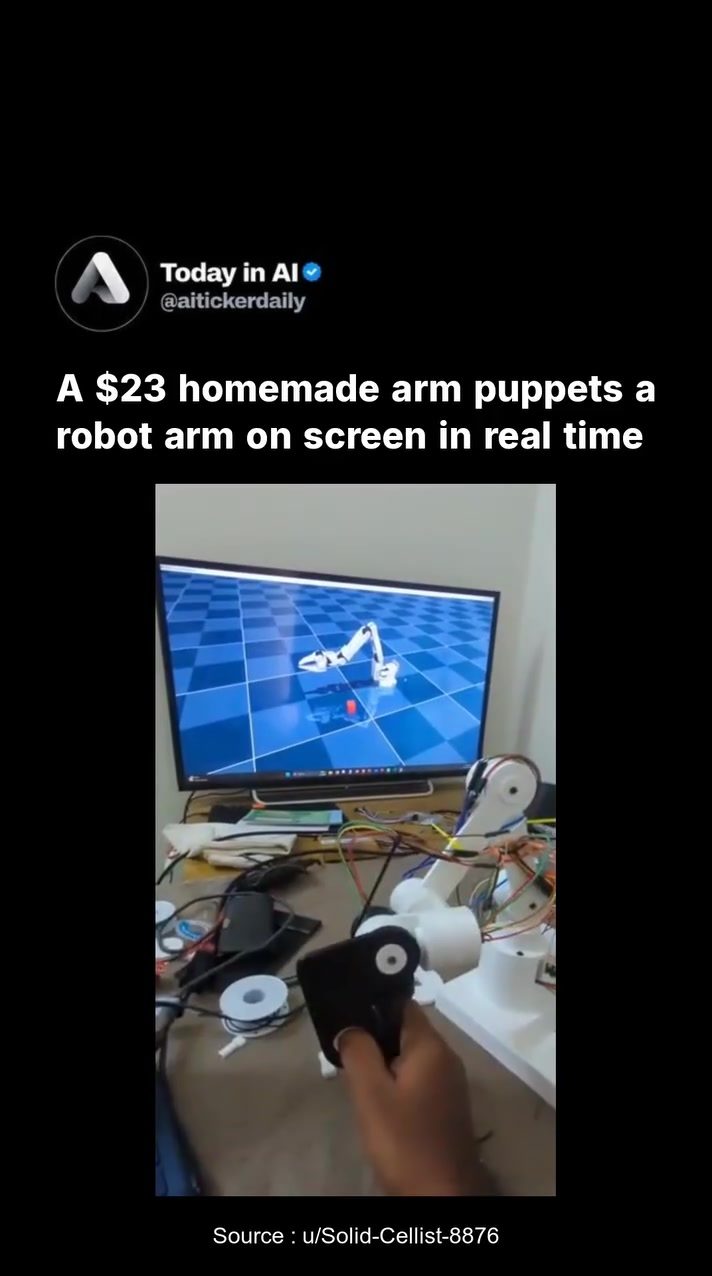
Homemade Robot Arm
Creating a functional robot arm at home doesn't have to be an expensive endeavor. Maker aitickerdaily demonstrated this with his DIY teleoperation robot arm, built for a mere $23. This budget-friendly project challenges the notion that accessible robotics requires significant investment.
Why This Matters
In a world where robotics kits can run into the hundreds of dollars, building a functional robot arm for $23 is a game-changer. This project not only showcases the potential for affordable robotics but also highlights the innovation and creativity of DIY enthusiasts.
Building a DIY Robot Arm
Understanding the Components
To create this robotic arm, aitickerdaily utilized a combination of readily available and affordable components:
- AS5600 Encoders: Six of these were used to track the arm's movements and provide real-time feedback.
- 608 Bearings: These ensure smooth movement and reduce friction within the arm's joints.
- 3D-Printed Frame: The frame was printed in-house, allowing for customization and cost savings.
The Role of Encoders
Encoders are crucial for the arm's precision and control. By using AS5600 encoders, the maker was able to track the arm's movements accurately. This allowed the physical controller to mirror the robot arm's actions in real-time on the screen. This was a key factor in reducing the overall cost of the project.
The Importance of 3D Printing
3D printing became a vital part of the project, allowing for the creation of a custom frame. This not only kept costs low but also ensured that the design was tailored precisely to the maker's specifications.
Real-Time Teleoperation
One of the standout features of this project is the real-time teleoperation capability. As the maker moved the physical controller, the robot arm on the screen mirrored these movements in real-time. This functionality is typically associated with high-end robotics kits, making it remarkable that it was achieved at such a low cost.
Cost Efficiency
The key to keeping the project within its budget was the strategic use of cheap encoders instead of more expensive motors. This decision significantly reduced costs and made the project accessible to anyone with basic 3D printing and assembly skills. It turned a usually expensive robotics project into an affordable weekend build.
Practical Tips for Building Your Own
Start with a Plan
Before jumping into the project, outline your goals and the features you want in your robot arm. This will help you determine the necessary components and ensure a smooth building process.
Gather the Right Tools
Ensure you have access to a 3D printer to create the frame and other custom parts. Additionally, you'll need tools for assembly, such as screwdrivers, pliers, and possibly a soldering iron, depending on the components you choose.
Invest in Quality Encoders
Quality encoders are essential for accurate movement tracking. Investing in reliable encoders like the AS5600 will ensure your arm functions as intended and provides precise feedback.
Experiment and Iterate
Don't be afraid to experiment with different designs and components. Prototyping and iterating are key parts of the DIY process, and you may find unexpected solutions or improvements along the way.
Important Takeaways
Accessible Robotics
This project demonstrates that accessible robotics is within reach for many DIY enthusiasts. By leveraging affordable components and 3D printing, it's possible to build a functional robot arm at a fraction of the cost of commercial kits.
Innovation in DIY
DIY robotics offers a unique opportunity for innovation. The ability to customize and experiment with your project can lead to unique solutions and new discoveries.
The Power of Real-Time Control
Real-time teleoperation adds a new dimension to robotics, allowing for precise and immediate control. This feature is typically found in high-end kits, but with the right components and design, it can be achieved at a much lower cost.
Conclusion
The $23 homemade robot arm is a testament to the potential of DIY robotics. By leveraging affordable components and 3D printing, the aitickerdaily demonstrated that creating a functional and precise robot arm is within reach for many makers. The innovation and creativity shown in this project inspire others to explore the world of robotics, proving that you don't need a large budget to achieve impressive results.
Questions readers ask
What is a DIY robot arm and how does it work?
A DIY robot arm is a homemade robotic device that can be built using affordable components and 3D printing. It typically mimics the movements of a human arm and can be controlled manually or through programming. It works by converting electrical signals into mechanical movements, allowing it to perform various tasks.
What makes the $23 DIY teleoperation robot arm project unique?
The $23 DIY teleoperation robot arm project is unique because of its incredibly low cost compared to commercially available robotics kits. It uses readily available and inexpensive components, making high-end functionality accessible to hobbyists and makers on a tight budget.
What are the main components needed to build a DIY robot arm?
The main components include a microcontroller like Arduino, affordable servos or motors, a 3D printer for custom parts, and basic electronic components such as wires and connectors. The AS5600 is a specific component mentioned in the article, which is likely a rotary magnetic encoder used for precise angular measurement.
Can I build a DIY robot arm if I don't have a 3D printer?
While having a 3D printer makes the building process easier and more cost-effective, it is not strictly necessary. You can explore alternative methods like laser cutting or even using off-the-shelf parts to create the structure of your robot arm. However, some customization may be limited.
How can I control my homemade robot arm?
You can control a homemade robot arm through teleoperation, which means manually controlling it in real-time. This is typically done using a joystick, game controller, or even a custom interface programmed on a computer. The control signals are sent to the robot arm's microcontroller, which then activates the servos or motors to perform the desired movements.
What are the benefits of building a DIY robot arm over buying a pre-made kit?
Building a DIY robot arm offers several benefits, including a deeper understanding of robotics, cost savings, and the satisfaction of creating something from scratch. Additionally, you can customize the design and functionality to suit your specific needs and interests, making it a more personalized project.
What skills do I need to build a DIY robot arm?
To build a DIY robot arm, you should have basic knowledge of electronics, programming, and 3D modeling or design. Familiarity with microcontrollers like Arduino and experience with basic soldering are also beneficial. Following detailed guides and tutorials can help you develop these skills as you work on your project.
Recent articles
Fresh deep dives from the latest Reels we unpacked.




Comments
Be the first to comment.