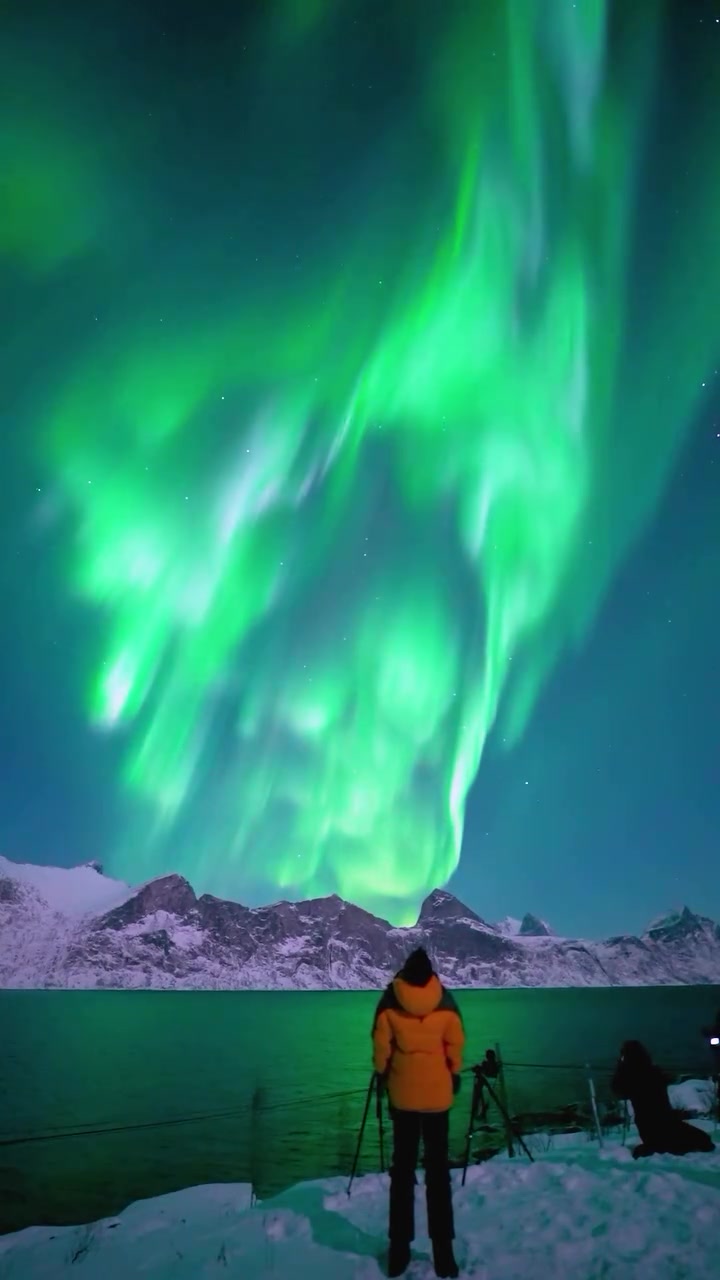
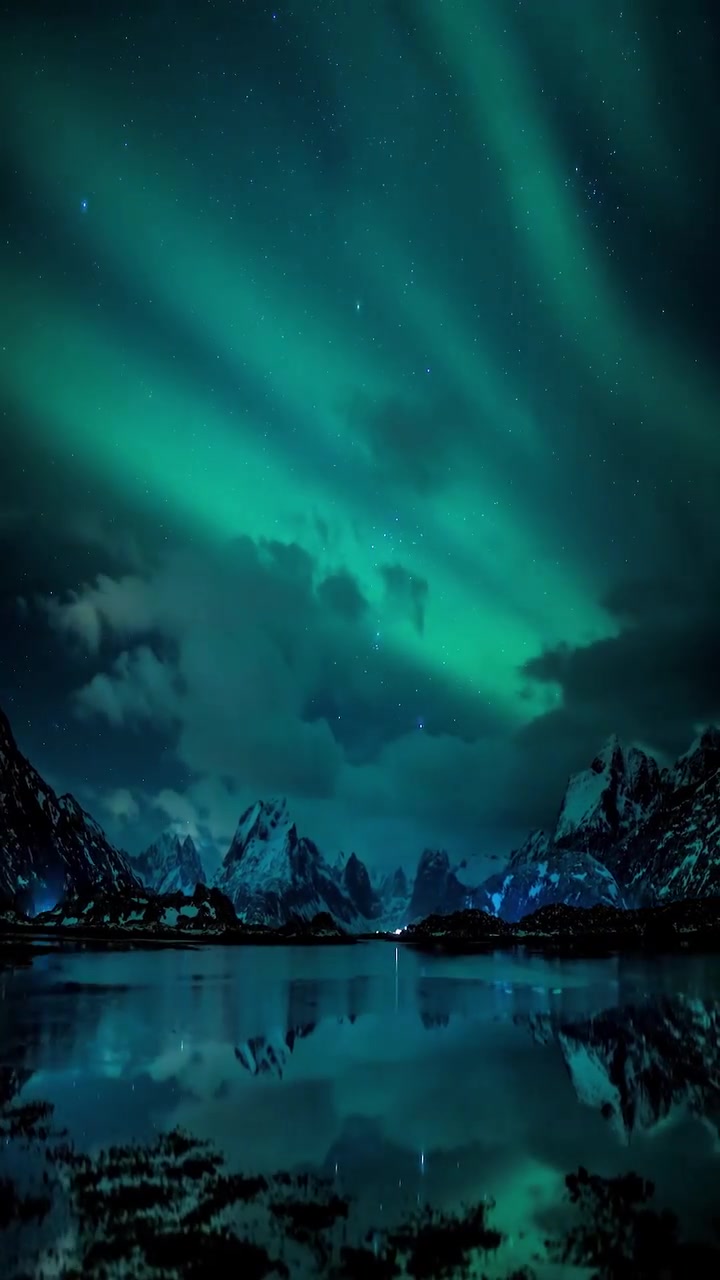
Under the vast, star-speckled sky of a northern night, a lone figure stands beside a still body of water. The camera is mounted on a tripod, pointed skyward toward the vibrant green lights dancing across the heavens. This is aurora photography, capturing the ethereal beauty of the Northern Lights as they drift above the snow and ice. Aurora Borealys photography is a specialized discipline that captures the beauty of these natural light displays. The Northern Lights, or Aurora Borealis, are caused by the interaction of charged particles from the sun with Earth's magnetic field. They manifest as shimmering ribbons and arcs of light in the sky, typically in shades of green, pink, and purple. Photographers chase these elusive displays, often in frigid conditions, to create stunning images that capture the ephemeral dance of light. Camera settings and preparation are crucial for aurora photography. Long exposures are necessary to capture the movement of the lights. A sturdy tripod is essential to keep the camera steady during these long exposures. Wide-angle lenses are typically used to capture as much of the sky as possible, and high ISO settings are often employed to enhance light sensitivity. A remote shutter release or intervalometer helps to minimize camera shake. Post-processing software is used to further enhance the images, adjusting contrast, saturation, and sharpness to bring out the best. Aurora photography has surged in popularity with the rise of social media and the increasing accessibility of high-quality cameras. More people than ever are traveling to high-latitude regions in search of the Northern Lights, driven by a desire to capture and share these mesmerizing displays on platforms like Instagram. This trend has led to a boom in aurora-based tourism, with destinations in countries like Iceland, Norway, and Canada hosting an ever-growing number of "aurora hunters." The visual spectacle of the Northern Lights translates seamlessly into eye-catching content, fueling the allure of these natural phenomena in the digital age.
The Geography of Aurora Photography
Northern Lights are captured around the world, though specific areas offer consistently better views. These lights can be seen for most of the year, but they are most visible in the winter. Iceland, Norway, Sweden, Finland, Canada, and Alaska are all popular destinations for aurora photography. The lack of ambient light from city lights offers the best viewing opportunities. In Iceland, aurora photographers often travel in well-known places like Reykjavik, Þingvellir and Snaefellsnes. In the Canadian landscape, destinations like Churchill, Manitoba, and the Yukon offer pristine wilderness settings. Consistent aurora viewing requires a bit more than a sunny starry sky: a favorable solar wind, geomagnetic activity, and no cloud cover. Choosing the right destination for your next adventure requires careful planning.
Modern Consumers Invest In Equipment
In most cases, aurora capture depends on strong equipment. The right gear can make or break the perfect shot. This specialized photography requires:
- Tripod: For the perfect shot, your tripod needs to be stable and sturdy. The tripod must handle strong winds and cold temperatures. In snowy conditions, it may need to last for hours on end.
- Camera: Cameras that are better for astrophotography are generally mirrorless or DSLRs. High ISO settings are necessary to capture the lights. Look for a camera that has an ISO that can be adjusted.
- Lens: Again, wide-angle lenses are the best. It will allow the photographer more of the sky. Using a wide-angle lens imparts specifics in the foreground and background.
- Filters: Polarizing filters and UV filters are essential in capturing any photograph.
- Remote shutter release: To avoid camera shake, invest in a good one.
- Intervalometer: This tool can help with time-lapse photography. This will help capture the arc of the aurora across the sky.
Photographing Aurora Borealis in Two Ways
Expert Tips
Aurora photography is challenging, but rewarding. Here are a few tips to get you started: Find the right location: The best time to see auroras is during the winter months, during a new moon phase, and in dark skies. Use the right gear: Plan ahead and bring a high-quality camera, tripod, sturdy boots, and a headlamp. Prepare for cold weather. Dress in layers and bring a thermos of hot coffee or tea.
- Prepare your camera: Set your camera to manual. Set it for the widest aperture (f/2.8 if available). Turn off image stabilization. Lower the shutter speed to 20-25 seconds, and raise your ISO to at least 1600.
- Get creative: Try different compositions. Pair the Northern Lights with a foreground or a silhouette.
Pro Tips
- F/stop: You can get away with f/2.8. For these situations, a large aperture is better. You will have a faster shutter speed, hence reducing the star trails.
- Exposure time: Exposure time needs to be determined before the shot so you can maximize the arc. A longer exposure will yield more color but the trail phenomenon.
- ISO: Keep in mind the need for a low ISO. This can control the dynamic range of the photo. 1600 is a good benchmark, but shooting in dark conditions may demand a higher ISO. IN the end, photographing the aurora is a balance: the correct mix of sharp focus and shutter speed, heating, and tripod.
Sharpening the Image
Post-processing is a crucial component of aurora photography. In addition to basic adjustments, many photographers enhance their images with advanced techniques. Once the image is captured, use software to enhance your shot. With photo-editing software, shooters adjust the contrast and brightness of the image. Add different filters to make the image look its best. Aurora photographers use photoshop to enhance the color saturation of the aurora. They shift the color balance and apply noise reduction filters to maximize the quality of the image. Some photographers use the dodge and burn tool to highlight certain areas and make the aurora stand out. Some photographers even add textures and overlays to give their photos an artistic touch. The goal is to bring out the best in the image, ensuring the Northern Lights shine brighter and more vibrantly. While post-processing can enhance an aurora photograph, it's essential to remember that the final image should still look natural and true to the original scene. Overprocessing can lead to an unnatural, artificial look that detracts from the authenticity of the aurora. It's a fine line to walk, but with practice and patience, photographers can create stunning images that capture the raw beauty of the Northern Lights. Aurora photography is a journey through darkness. Taking pictures of the Northern Lights requires a lot of patience, long planning, and equipment. But in the end, it is all worth it. Shoulder the camera with love and indulge in the beauty of the Northern Lights. They are an experience for everyone!
Questions readers ask
What causes the Northern Lights to display different colors?
The colors of the Northern Lights are determined by the type of gas molecule that the charged particles from the sun collide with in Earth's atmosphere and the altitude at which this happens. Oxygen produces green and red lights, while nitrogen results in blue and purple hues. The most common color, a vivid green, occurs when oxygen molecules about 60 miles above the earth are excited by the electrons.
Can I photograph the Northern Lights with just a smartphone?
While smartphones have improved significantly, they typically lack the sensitivity and control needed for aurora photography. Long exposures, which are crucial for capturing the Northern Lights, are not possible with most smartphone cameras. A dedicated camera with manual controls and a tripod is recommended for the best results.
How do I find the best locations for aurora photography?
The best locations for aurora photography are typically in high-latitude regions with minimal light pollution. Iceland, Norway, Sweden, Finland, Canada, and Alaska are popular choices. Specific spots within these regions, like Þingvellir in Iceland or Churchill in Canada, offer stunning landscapes and clear skies. Researching the best times and locations, along with checking weather forecasts, can greatly enhance your chances of capturing the Northern Lights.
What is the best time of year to see the Northern Lights?
While the Northern Lights are visible throughout the year, they are most easily seen during the winter months. This is because the nights are longer and darker, providing a better backdrop for the lights. Additionally, the clear, cold winter air can enhance visibility. However, it's important to check local weather conditions, as cloud cover can obscure the view.
Is it safe to travel to these northern regions for aurora photography?
Traveling to high-latitude regions for aurora photography is generally safe, but it requires preparation. The weather can be harsh, with extremely cold temperatures and strong winds. Proper clothing, including thermal layers, insulated boots, and gloves, is essential. Additionally, having a reliable vehicle and knowing how to navigate in snowy conditions can enhance safety. Many tours and guides are available to assist photographers, ensuring a safe and enjoyable experience.
What are the differences between aurora photography in Iceland and Norway?
Iceland and Norway both offer stunning landscapes for aurora photography, but they have distinct features. Iceland is known for its dramatic landscapes, including glaciers, volcanoes, and black sand beaches, which provide unique backdrops for the Northern Lights. Norway, on the other hand, offers fjords, mountains, and the famous Lofoten Islands, which are particularly beautiful during the winter months.
What are some common pitfalls to avoid in aurora photography?
Common pitfalls in aurora photography include using the wrong camera settings, not having a stable tripod, and not checking weather conditions. Long exposures are necessary, so a sturdy tripod is essential to keep the camera steady. Additionally, high ISO settings and a wide-angle lens can enhance the visibility of the lights. Post-processing is also important, as it can bring out the details and colors of the aurora. Finally, always be prepared for the weather and have the right gear to stay warm and safe.
Related deep dives
Similar reads based on topic and creator.
Recent articles
Fresh deep dives from the latest Reels we unpacked.
Comments
Be the first to comment.