Optimizing Nginx Load Balancing for High-Traffic Applications
Understanding Nginx Load Balancing
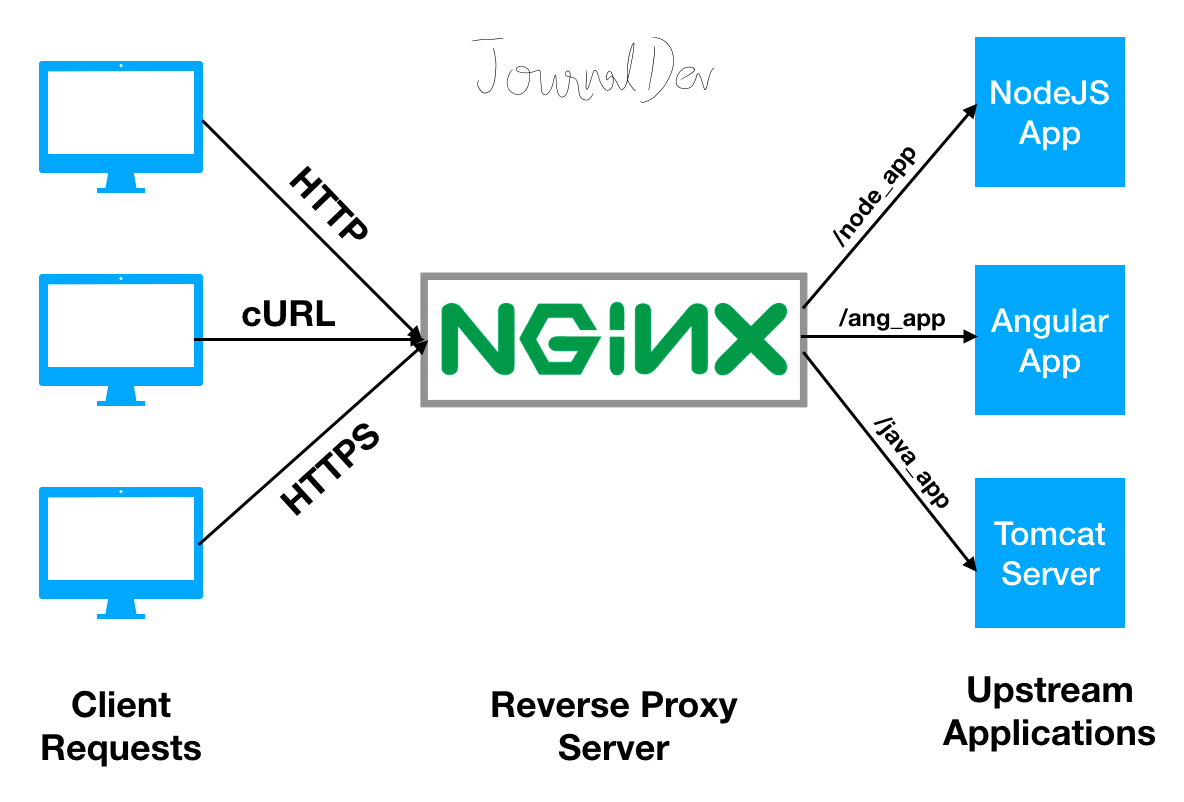
Nginx is a powerful web server and reverse proxy that supports various load balancing methods to distribute incoming traffic efficiently across multiple backend servers. Load balancing is crucial for high-traffic applications to ensure scalability, reliability, and optimal resource utilization.
Load Balancing Methods Supported by Nginx
Nginx offers several load balancing methods to suit different application requirements:
- Round-Robin: Each incoming request is sent to the next available backend server in a predetermined sequence.
- Least-Connected: Incoming requests are directed to the backend server with the fewest active connections.
- IP-Hash: Requests are distributed based on the client's IP address, ensuring that requests from the same IP are always sent to the same backend server.
Benefits of Load Balancing with Nginx
Load balancing with Nginx offers numerous benefits for high-traffic applications:
- Improved Performance: By distributing requests across multiple servers, load balancing reduces the load on individual servers, resulting in faster response times and improved overall performance.
- Enhanced Reliability: If one backend server becomes unavailable, Nginx can redirect requests to other available servers, ensuring minimal downtime and maintaining application availability.
- Scalability: Load balancing enables easy addition or removal of backend servers as traffic demands change, making it easier to scale applications.
Setting Up Nginx as a Load Balancer
Configuring Nginx as a load balancer is a crucial step in ensuring high availability and scalability for high-traffic applications. Here's a detailed guide to set up Nginx as a load balancer:
Step 1: Define an Upstream Element
Start by defining an upstream element in the Nginx configuration file (usually nginx.conf). This element lists the backend servers that will receive incoming requests. Use the following syntax:
upstream backend { server (link unavailable); server (link unavailable); server (link unavailable); }
Replace the server names with your actual backend server addresses.
Step 2: Map a URI to the Upstream Cluster
Next, map a URI to the upstream cluster using the proxy_pass directive in a location setting. This setting routes incoming requests to the upstream servers:
location / { proxy_pass http://backend; proxy_set_header Host $host; proxy_set_header X-Real-IP $remote_addr; }
This configuration forwards requests to the upstream cluster and sets the Host and X-Real-IP headers.
Step 3: Restart Nginx
After updating the Nginx configuration file, restart the Nginx server to apply the changes:
sudo systemctl restart nginx
or
sudo service nginx restart
depending on your system's service manager.
Verification
Verify the load balancing setup by accessing your application's URL. Nginx will distribute incoming requests across the backend servers. You can test this by:
- Using tools like curl or wget to simulate requests.
- Monitoring backend server logs to ensure requests are being distributed.
By following these steps, you've successfully set up Nginx as a load balancer for your high-traffic application.
Advanced Configurations and Optimizations
Once you have NGINX load balancing set up for your high-traffic application, it's essential to dive into advanced configurations and optimizations to ensure maximum performance and reliability.
NGINX Status Module
One crucial technique is setting up the NGINX status module, which provides real-time metrics and monitoring capabilities. This module allows you to:
- Monitor active connections and requests
- Track response times and upstream latency
- Identify potential bottlenecks and performance issues
To enable the status module, add the following configuration to your NGINX file:
http { ... server { listen 80; server_name (link unavailable); location /nginx_status { stub_status on; access_log off; allow 127.0.0.1; deny all; } } }
Additional Optimizations
Beyond the status module, consider implementing the following advanced configurations and optimizations:
- Enable keepalive connections to reduce the overhead of establishing new connections
- Configure caching to reduce the load on upstream servers
- Implement SSL/TLS termination to offload encryption tasks from upstream servers
- Use NGINX's built-in support for HTTP/2 to improve performance and concurrency
By implementing these advanced configurations and optimizations, you can unlock the full potential of NGINX load balancing and ensure your high-traffic application remains performant, reliable, and scalable.
Monitoring and Troubleshooting
Ensuring the optimal performance of your NGINX load balancer and backend servers requires continuous monitoring and troubleshooting. In this section, we will explore two essential techniques to help you achieve this.
Enable the NGINX Status Module
The NGINX status module provides valuable insights into the performance and health of your load balancer and backend servers. To enable this module, add the following directive to your NGINX configuration file:
http { ... server { ... location /nginx_status { stub_status; } } }
This will enable the status module and provide real-time metrics on your server's performance, including:
- Active connections
- Requests per second
- Reading and writing speeds
- Number of waiting requests
Use the Stub Status Directive
The stub_status directive provides detailed metrics on your server's performance, including:
- Accepts: Total number of accepted requests
- Handled: Total number of handled requests
- Requests: Total number of requests (including redirects)
- Reading: Number of requests currently being read
- Writing: Number of requests currently being written
- Waiting: Number of requests waiting for a worker process
By monitoring these metrics, you can quickly identify performance bottlenecks and troubleshoot issues with your load balancer and backend servers.
Conclusion
Nginx load balancing is a powerful tool for optimizing application performance and reliability. By distributing incoming traffic across multiple servers, it ensures that no single server becomes a bottleneck, leading to improved responsiveness, reduced latency, and increased overall throughput.
Maximizing the Benefits of Nginx Load Balancing
By following best practices and advanced configurations, you can maximize the benefits of Nginx load balancing. Some key takeaways include:
- Implementing a robust server monitoring system to detect and respond to server failures
- Utilizing session persistence techniques, such as IP Hash or Sticky Cookies, to ensure seamless user experiences
- Configuring SSL/TLS termination to offload encryption tasks from backend servers
- Optimizing upstream server configurations for efficient communication
- Leveraging Nginx's built-in caching and content compression capabilities
- Regularly reviewing and refining your load balancing strategy to adapt to changing application demands
Unlocking High-Traffic Application Success
By mastering Nginx load balancing, you can unlock the full potential of your high-traffic applications. With a well-designed and optimized load balancing strategy, you can:
- Ensure 99.99% uptime and reliability, even during peak traffic periods
- Improve page load times and overall user experience
- Scale your application infrastructure with confidence
- Enhance security and protect against common web attacks
In conclusion, Nginx load balancing is a critical component of modern web infrastructure. By embracing best practices, advanced configurations, and continuous optimization, you can harness the power of Nginx to drive application success and deliver exceptional user experiences.


Comments ()